Found a list online of vacuum hose part numbers. Apparently most of them are no longer available. But good reference. I added the EPC descriptions.
TECALAN (GmbH) Thermoplastic Pipes
000-158-14-35 - Transparent (sort of white)
-- Intake manifold (850mm)
000-158-35-35 - Red?
000-158-88-35 - Transparent with brown stripe
-- Throttle valve to thermo-valve (370mm)
-- Thermo-valve to exhaust gas recirculation valve (550mm)
000-158-89-35 - Transparent with red stripe
000-158-90-35 - Transparent with yellow stripe
-- Throttle housing to control valve (180mm)
000-158-91-35 - Transparent with blue stripe
-- Intake manifold to electric change-over valve (1130mm)
000-158-92-35 - Transparent with grey stripe
000-158-93-35 - Transparent with black stripe
-- Throttle housing to thermo-valve (350mm)
000-158-94-35 - Transparent with green stripe
000-158-96-35 - Transparent with violet & brown stripe
-- EGR valve to thermo-valve (150mm)
-- EGR valve to thermo-valve (660mm) (from 1988)
000-158-97-35 - Transparent with violet & red stripe
000-158-98-35 - Transparent with violet & yellow stripe
000-158-99-35 - Transparent with violet & blue stripe
-- Shut-off valve to electric change-over valve (1000mm)
000-997-39-52 - Brown
001-997-81-52 - Black
116-276-06-30 - Black with white lettering
123-276-16-30 - Black with red stripe
The little black rubber elbows are #117 078 05 81
Saturday, April 16, 2011

Tuesday, April 12, 2011
Top End Rebuild - Day 6
Spent a little over 2 hours on the car today. Managed to remove all 2 nuts + 2 bolts from the passenger side exhaust manifold. What an ordeal! My left hand from the finger tips to the wrist is sore. Thank God none of the fittings were seized otherwise it would have been impossible. I should hopefully have the exhausts off the car by the end of the week. What a pain.
Monday, April 11, 2011
Top End Rebuild - Day 5
Hardly worth chalking it up as an actual "Day" since I spent less than an hour on the car today. Thought of taking off the radiator for better access to the accessories but saw the oil cooler lines and said naah. Didn't feel like dealing with that mess today.
Put the front of the car on axle stands so I could creep under it and look at the exhaust. Can't figure out how to remove the damn thing. Luckily none of the bolts I did manage to remove were seized. Nevertheless, I can't even access the lower nuts. The workshop manual says you need to "lift" the engine - I say you can piss off. I'm not lifting the engine. I don't have the means to do that even if I wanted to.
Can the heads be removed with the exhaust manifold still attached? The driver's side looks even worse for clearance. How the hell do you remove the exhaust manifold.


Put the front of the car on axle stands so I could creep under it and look at the exhaust. Can't figure out how to remove the damn thing. Luckily none of the bolts I did manage to remove were seized. Nevertheless, I can't even access the lower nuts. The workshop manual says you need to "lift" the engine - I say you can piss off. I'm not lifting the engine. I don't have the means to do that even if I wanted to.
Can the heads be removed with the exhaust manifold still attached? The driver's side looks even worse for clearance. How the hell do you remove the exhaust manifold.


Sunday, April 10, 2011
Top End Rebuild - Day 4
Finally the intake manifold comes off! Removing the small hose going to the water pump seems to have helped. I used a broken wooden spade handle and pried the intake manifold loose. On an original setup, you have to remove the top half of the manifold first. This is because of the way the EGR pipe is clamped down.

 The EGR pipe is clamped in 3 places. Once on the driver's side exhaust shield, once behind the cylinder head and one more time on the plenum. You cannot remove the clamp behind the cylinder head without removing the head from the car. Thus you have to separate the intake manifold into two pieces and remove the clamp on the plenum and wiggle the plenum out - leaving the EGR pipe clamped to the head. If it wasn't for this one clamp, you could remove the intake manifold with the plenum as one assembly all together. When it comes down to reassembly I think I'm going to omit the clamp behind the cylinder head. EDIT: You can remove the clamp. Its just very difficult.


The intake manifold gasket was pretty much shot. It was brittle and torn. I even found engine oil in the plenum so that gasket was really done. The coolant passages? along the cylinder head had carbon deposits baked in. Check out the pictures.
 No one would ever believe that these timing chain guide rails were originally white in colour. Mine were reddish brown. Long past their life span. The chain didn't look too bad, but it'll be changed as well with the tensioner. Not taking any chances here.
 Mercedes makes some amazing cars, but they also do some amazingly stupid things. How are you supposed to work on the passenger's side cylinder head - removing the exhaust manifold and what have you, with the battery shield protruding so much into the engine bay. I always thought that British cars were designed by the devil. Now I see that Germans cars are just as bad.


 The EGR pipe is clamped in 3 places. Once on the driver's side exhaust shield, once behind the cylinder head and one more time on the plenum. You cannot remove the clamp behind the cylinder head without removing the head from the car. Thus you have to separate the intake manifold into two pieces and remove the clamp on the plenum and wiggle the plenum out - leaving the EGR pipe clamped to the head. If it wasn't for this one clamp, you could remove the intake manifold with the plenum as one assembly all together. When it comes down to reassembly I think I'm going to omit the clamp behind the cylinder head. EDIT: You can remove the clamp. Its just very difficult.

The intake manifold gasket was pretty much shot. It was brittle and torn. I even found engine oil in the plenum so that gasket was really done. The coolant passages? along the cylinder head had carbon deposits baked in. Check out the pictures.
 No one would ever believe that these timing chain guide rails were originally white in colour. Mine were reddish brown. Long past their life span. The chain didn't look too bad, but it'll be changed as well with the tensioner. Not taking any chances here.
 Mercedes makes some amazing cars, but they also do some amazingly stupid things. How are you supposed to work on the passenger's side cylinder head - removing the exhaust manifold and what have you, with the battery shield protruding so much into the engine bay. I always thought that British cars were designed by the devil. Now I see that Germans cars are just as bad.


Saturday, April 9, 2011
Top End Rebuild - Day 3
Spent about 4 hours on the car today. Wasted an hour trying to split the "Mixture Control Unit" into two pieces thinking it would aid in removal. But later found that you only need to remove the fuel pipes, the 4 mounting bolts and loosen the hose clamp on the air duct/guide housing and just yank the damn thing off. No need for splitting it.
Damn the throttle linkages. The worst design I've ever seen. Its going to be a real pain putting it back together.
Removed all the bolts on the intake manifold and loosened up the hose clamps on the two hoses going into the bulk head and the one hose going into the water pump. Tried to lift the intake manifold off but it just wouldn't budge. I can't figure out what's holding it back. Kept yanking at it for a good 30 mins and gave up. I'm going to get a bloody hernia if I keep at it.
How do I get the intake manifold off?


Damn the throttle linkages. The worst design I've ever seen. Its going to be a real pain putting it back together.
Removed all the bolts on the intake manifold and loosened up the hose clamps on the two hoses going into the bulk head and the one hose going into the water pump. Tried to lift the intake manifold off but it just wouldn't budge. I can't figure out what's holding it back. Kept yanking at it for a good 30 mins and gave up. I'm going to get a bloody hernia if I keep at it.
How do I get the intake manifold off?


Friday, April 8, 2011
Top End Rebuild - Day 2
Spent about 3hours on the car today. You would think that being German made there would be a little more logic to how things are designed and laid out in the engine bay but you would be wrong. Its just as convoluted, if not more so, than working on the XJ12.
The whole intake manifold / induction system is stupidly over complex. There are 100s of fittings for the most trivial things. The throttle linkage alone has about 30 components to it on the 560SEL. Compared to less than 5 pieces for the XJ12.
I wanted to have removed the intake manifold by today but there was just so much fettling to remove all the injection fuel lines that I didn't get that far. I loosened up all the intake manifold bolts so hopefully it will be out by Day 3.
The official Mercedes Workshop Manual is the dumbest service manual you will ever see. "Remove Intake Manifold" is one step in the head gasket R&R job (01-415) - I've spent 2 days removing the bloody intake manifold! You only really figure out the order in which to remove things once you get down to it. Lots of trial and error. Eg. I made the mistake of removing the injector retention bracket on Cylinder #7 before removing the fuel line and spent about half an hour correcting my mistake.
Finding parts numbers for all these vacuum fittings is turning out to be a little problematic. The dealership's parts catalogue is really ambiguous. Order the wrong part and you have to pay for it. Oh and that silly 20cm worth of metal fuel line I busted on Day 1, costs $250 from the dealer!
 Some part of the throttle linkage was covering one of the intake manifold bolts. Couldn't figure out how to remove it properly, so I just bent that piece upwards. Hopefully I'm not going to get into trouble for this. It only had some wires grounded on it, so it shouldn't be a problem.


 Look at how stupidly they have routed this vacuum line - under the fuel injection retention bracket. No wonder they are all brittle and breaking apart.
 Found a leaf on the intake manifold. How did that get there!


 Doesn't look like much progress, but I'm exhausted.
The whole intake manifold / induction system is stupidly over complex. There are 100s of fittings for the most trivial things. The throttle linkage alone has about 30 components to it on the 560SEL. Compared to less than 5 pieces for the XJ12.
I wanted to have removed the intake manifold by today but there was just so much fettling to remove all the injection fuel lines that I didn't get that far. I loosened up all the intake manifold bolts so hopefully it will be out by Day 3.
The official Mercedes Workshop Manual is the dumbest service manual you will ever see. "Remove Intake Manifold" is one step in the head gasket R&R job (01-415) - I've spent 2 days removing the bloody intake manifold! You only really figure out the order in which to remove things once you get down to it. Lots of trial and error. Eg. I made the mistake of removing the injector retention bracket on Cylinder #7 before removing the fuel line and spent about half an hour correcting my mistake.
Finding parts numbers for all these vacuum fittings is turning out to be a little problematic. The dealership's parts catalogue is really ambiguous. Order the wrong part and you have to pay for it. Oh and that silly 20cm worth of metal fuel line I busted on Day 1, costs $250 from the dealer!
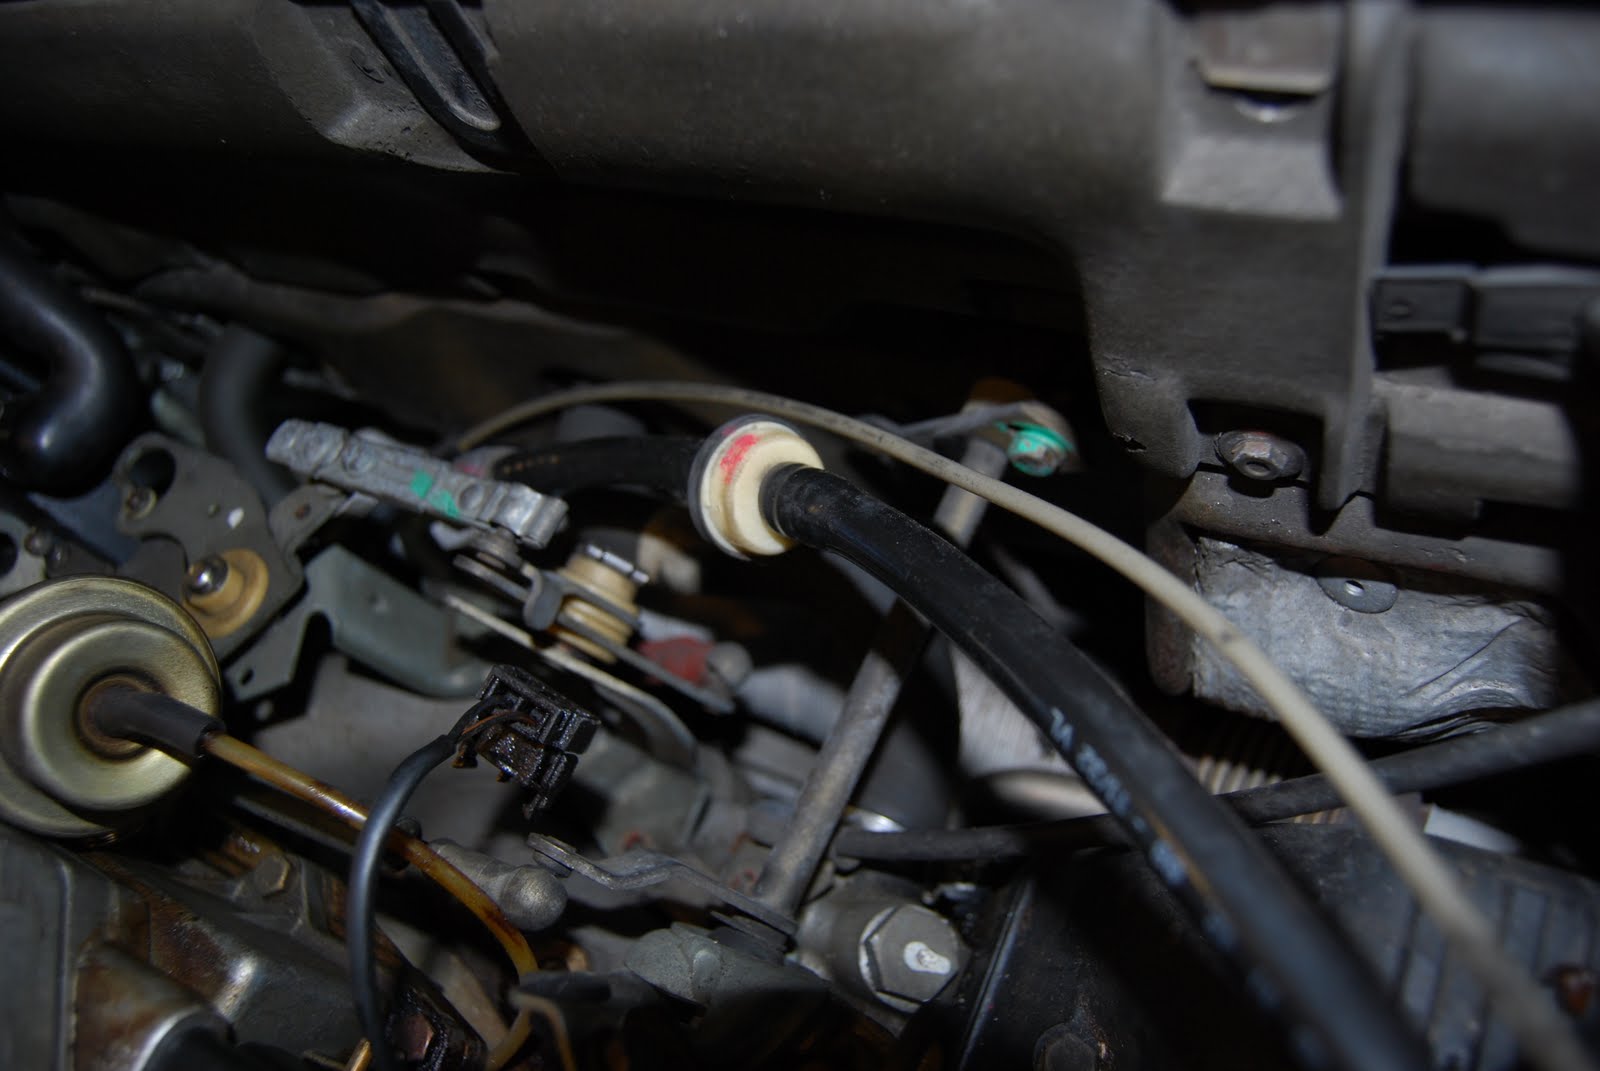 Some part of the throttle linkage was covering one of the intake manifold bolts. Couldn't figure out how to remove it properly, so I just bent that piece upwards. Hopefully I'm not going to get into trouble for this. It only had some wires grounded on it, so it shouldn't be a problem.

 Look at how stupidly they have routed this vacuum line - under the fuel injection retention bracket. No wonder they are all brittle and breaking apart.
 Found a leaf on the intake manifold. How did that get there!

 Doesn't look like much progress, but I'm exhausted.
Thursday, April 7, 2011
Head Gasket / Top End Rebuild - Day 1
Finally after 6 months of subzero temperatures, today was the first day it was actually warm enough to go outside and do anything on the cars. The poor 560 needs a new head gasket. With only 60k miles on it its rather sad that I have to rebuild the top end just because of the head gasket, but whatcha gonna do?
Spent about 2 hours on it today. Didn't really get far. My back and knees were killing me because of the way I was standing hunched over the car. I think its because the engine is far into the middle of the car and the car is fairly low. Anyhow, today I managed to drain the coolant, removed the spark plug wires, removed the air box and loosened up a few of the petrol lines. While taking off one of the bigger lines going into the fuel distributor I didn't notice the pipe twisting while I was unscrewing it. I'll have to replace it now. No biggie. Will need to buy another 17mm spanner to hold the other end of the lines when loosening them.
I noticed that there was red paint put on some of the bolt heads and fittings. This is a little worrying since I didn't expect anyone to have gone into the engine yet. What does it mean? I know some mechanics do things like that when they strip the bolt. They mark it with paint so they know the next time they go in that the bolt is stripped. So far it seems to be only the intake manifold bolts that have the red paint and one of the lines going into the fuel distributor. I removed one of the red painted bolts and it looked OK to me. I wonder. (UPDATE: The painted marks are done by machines during the manufacturing process to signal the end of a particular program).
All the vacuum lines were pretty brittle and will require renewing. Some of the thermo vacuum-switches snapped off while removing the vacuum lines so they will require renewing as well. Not sure exactly what the switches are for but I should be able to figure that out soon enough.
I'm going to need part numbers for all these things. Anyone have an illustrated PDF parts catalogue they wanna send me?


Spent about 2 hours on it today. Didn't really get far. My back and knees were killing me because of the way I was standing hunched over the car. I think its because the engine is far into the middle of the car and the car is fairly low. Anyhow, today I managed to drain the coolant, removed the spark plug wires, removed the air box and loosened up a few of the petrol lines. While taking off one of the bigger lines going into the fuel distributor I didn't notice the pipe twisting while I was unscrewing it. I'll have to replace it now. No biggie. Will need to buy another 17mm spanner to hold the other end of the lines when loosening them.
I noticed that there was red paint put on some of the bolt heads and fittings. This is a little worrying since I didn't expect anyone to have gone into the engine yet. What does it mean? I know some mechanics do things like that when they strip the bolt. They mark it with paint so they know the next time they go in that the bolt is stripped. So far it seems to be only the intake manifold bolts that have the red paint and one of the lines going into the fuel distributor. I removed one of the red painted bolts and it looked OK to me. I wonder. (UPDATE: The painted marks are done by machines during the manufacturing process to signal the end of a particular program).
All the vacuum lines were pretty brittle and will require renewing. Some of the thermo vacuum-switches snapped off while removing the vacuum lines so they will require renewing as well. Not sure exactly what the switches are for but I should be able to figure that out soon enough.
I'm going to need part numbers for all these things. Anyone have an illustrated PDF parts catalogue they wanna send me?


Subscribe to:
Posts (Atom)